Information submitted through the support site is private but is not hosted within your secure CDD Vault. Please do not include sensitive intellectual property in your support requests.
In this lesson we jump right into importing data. We will register a compound manually, then import a compound library from a file. We'll learn about handling of chemical structures and associated molecular information. We will learn how to prepare properly formatted import files in comma-delimited CSV or in SDF formats, and the import process itself. Many of CDDs' key elements introduced here in the context of compound libraries are also applicable to other types of data, and will reappear in subsequent lessons.
CDD is primarily a structure-activity relationship (SAR) database, designed for optimal storage of small molecules and associated biological results, with much emphasis on chemical intelligence surrounding the structures such as substructure and similarity searches. Therefore, all data in the database is linked to, and pivoted around molecules. CDD provides extensive structure and name validation of newly imported libraries, so it is important to supply the best structure representations available, including stereochemistry. In some cases when unambiguous structures are not available, CDD is flexible as well. Let's look at how to create a molecule record, and then how to import an entire library from a file.
If you prefer a summary as a short YouTube video, please view the following on this topic:
Molecules and chemical registration
Molecule Definition
A CDD molecule record typically represents the structure of a small drug-like compound that is being tested for pharmacological activity in screening assays. CDD provides pre-defined attributes, calculations, and tools that are important in this kind of research. However, a molecule record can store any other kind of testable entity, for which you wish to record data: such as fragments, peptides, antibodies, DNA fragments, or even patient information.
As compounds are purchased or synthesized for testing, they need to be registered in the vault as molecule and batch records. There are two different registration modes available. By default, CDD vault will come enabled with a formal autogenerated chemical registration system. Users can also opt to use a custom registration system allowing users to deviate from the traditional CDD identifier conventions (e.g., CDD-0000001-001). Please consult the Configuring Registration Forms and Systems article to learn more.
Example
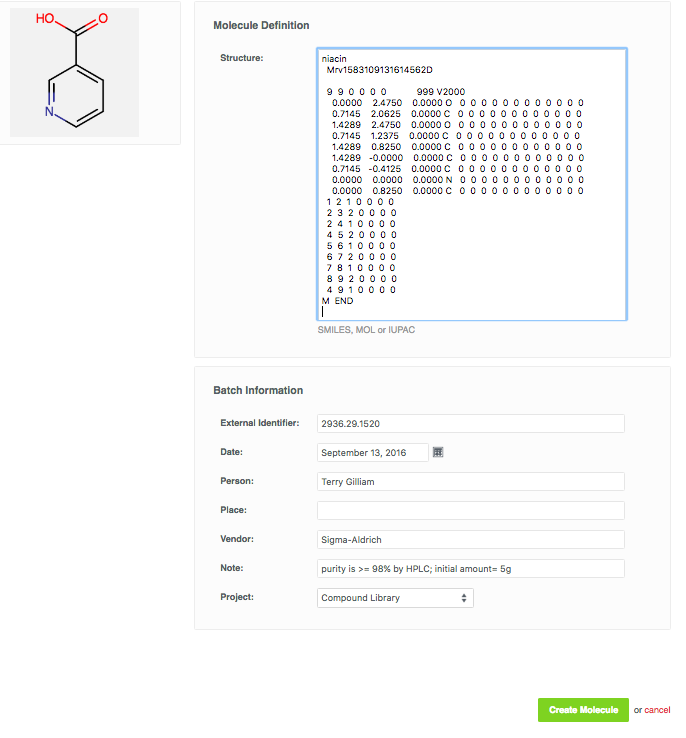
Let's manually register Niacin: 5g of Niacin ( SMILES: OC(=O)C1=CC=CN=C1 ), purchased from Sigma-Aldrich. Sigma sent the following accompanying information: Sigma catalog number: N4126-5G, Sigma Lot number: 2936.29.1520, CAS Number: 59-67-6, purity >= 98% by HPLC.
In order to capture all of this information in CDD vault, we need to define a field that will store each piece of information. This is done using chemical registration, which is described below.
Chemical registration
The CDD compound registration system automatically generates unique molecule and batch IDs. Salts and solvates are automatically stripped from the core structure, and a unique numeric identifier is assigned to both the core structure and each new batch. Salt information is stored as a batch field, and the formula weight is calculated automatically based on the core structure and salt stoichiometry. Thus every unique core structure is assigned a unique molecule name, and there may be multiple batches with different salt forms for each molecule.
CDD also supports "structureless registration", which is useful when handling mixtures, natural products, or other cases where a defined structure in not possible. Note, that although importing compounds can be done in bulk, updating structures at a later time must be done manually to ensure data integrity.
A new compound record consists of two core parts: the structure of the compound (including the salt) and batch-related attributes. A brand new CDD vault will have a set of molecule/entity and batch attributes already defined. These may be used as is, or configured specifically for your needs on the Settings > Vault > Molecule Fields page and/or the Settings-> Vault-> Batch Fields page (vault administrator only).
Here is a list of pre-defined molecule and batch attributes that can be populated, and how it can be applied to the Niacin example above. The list is sufficient to capture everything except the Sigma Lot number and CAS numbers. We need to create new fields for them.
Parameter
How supplied
Description
Example/Notes
Molecule Name
Auto-generated by CDD
Unique name and primary identifier of the molecule. This is generated based on the registration sequence.
DEMO-0000001: for this example, prefix "DEMO" is used, and Niacin is the first compound in the vault.
Synonyms
optional
Unique name, and secondary identifier of the molecule. Synonyms are checked for uniqueness just like molecule names. This field can have multiple values.
We suggest to use this field only if the identifier is truly unique, such as common- or trade-names. E.g. "Niacin" is unique, an identifier such ABC-12345 might not be.
Structure
Required for defined molecules, but structureless registration is supported
May be supplied in any of the following formats: SMILES, MOL files, extended SMILES, or drawn using CDDs' structure editor. A salt may be included in the structure.
If no structure is supplied by user, none of the chemical properties can be calculated.
This is a structure image. You can draw it in the structure editor, or paste as a SMILES string: OC(=O)C1=CC=CN=C1
Batch Name
auto-generated
Batch names are auto-generated as a 3 digit number. Alternate batch naming scheme is possible prefix-based on salt form of the compound.
001: Salt data are stored in a separate batch field.
Batch Salt
automatically stripped from structure or entered as a separate field
Salt and solvate stripping occurs automatically, unless this information is imported via a separate text-based salt field. See this article for in-depth compound registration.
No salt, free base or acid: if there is no salt information present.
Formula Weight
auto-generated
The formula weight is automatically calculated based on the stoichiometry of core structure, salt and solvent.
123.109 g/mol
Date
optional, but we highly recommend you make it required.
Synthesis or purchase date. (An admin may rename the field appropriately.)
today's date: the default date when registering a compound. You can change this to reflect the right date.
Person
optional, but we highly recommend you make it required
Responsible chemist or another responsible contact. (An admin may rename the field appropriately.)
Your Name: your name is entered automatically when you register a new compound. You can change this to reflect the right owner.
Vendor
optional
Vendor name, if this is a purchased compound. (An admin may rename the field appropriately.)
Sigma-Aldrich
Note
optional
Any additional batch-specific information, such as initial amount, purity, or appearance comments. This field can have multiple values. (An admin may rename the field appropriately.)
purity >= 98% by HPLC; cat. no N4126-5G any information can be stored here, e.g. additional vendor batch information
Registration Rules through the use of Batch Fields
All of the fields listed above can be managed on the Settings->Vault->Batch Fields pages by the Vault Administrator. This feature is described in detail here. Let's add a new Batch field now. Navigate to this page, and click "Add/edit batch fields". At the bottom of the list click "Add a batch field", and fill in the form as follows, then move the new field to the top of the list using the up/down icon, and click "Update batch fields". The new "External ID" field is now added to every new batch record, and we can use it to store the Sigma-Aldrich lot number in our niacin example. Of course you may add multiple fields and name them as required, e.g. instead of "External Identifier" you might want to name it "Catalog Number" and a second field "Lot Number".
Name
Data Type
Must be Unique
This field
Move up/down icon
External Identifier
Text
is optional
Registration Rules through the use of Molecule Fields
Molecule/Entity fields allow you to customize a top-level parent record if you wish to store information about the molecule/entity that does not fit into any pre-defined fields. Let's add a new Molecule/Entity field now. Navigate to the Settings > Vault > Molecule Fields page, and click "Add/edit molecule fields". At the bottom of the list click "Add a molecule field", fill in the form to add a new CAS text molecule field, and click "Update molecule fields".
When you think about your vault configuration, consider how you wish to classify different attributes: does it make more sense simply as a note, a separate field, or will your future searching and sorting needs be better met if you to store it as a Molecule/Entity field.
Hands on example
Moving from theory to practice, register Niacin in CDD on your own using the table above. If you haven't logged into your CDD sandbox, do so now. Your sandbox vault will have a registration sequence based on the name of the vault.
Directly from the Explore Data page, click on Create a new in the side-bar, and choose Molecule.
Fill in the initial form with the structure and all batch information, as shown in the table above. Structure can be supplied as SMILES, MOL files, or extended SMILES (CXSMILES). We’ll use the structure editor here, but feel free to try out entering the SMILES string OC(=O)C1=CC=CN=C1.
Click on "Launch the structure Editor" box, and let's draw Niacin.
If you are familiar with chemical structure editors such as ChemDraw, the Ketcher Structure Editor will look very similar. Use the structure template on the bottom, elements on the right, and bonds on the left.
When you are finished drawing, click "Use this structure" to send it to CDD's molecule form. Notice that now a structure preview is shown in the form, as well as the SMILES structure representation. Choose the correct project and click "Create Molecule".
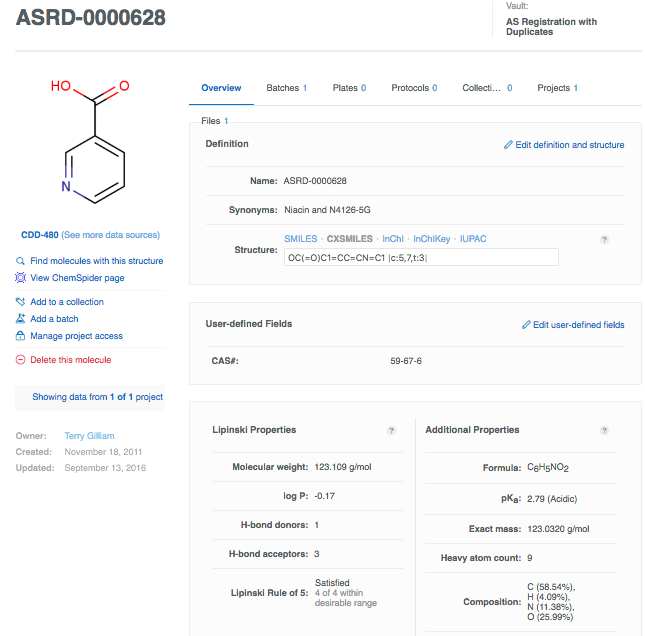
As the core molecule record is created, you are taken to the Molecule Details page. This is where additional attributes can be added and/or edited. The page has an Overview tab, Batches, Plates, Protocols and Files. The record also has a left-hand meta-data panel, with a structure preview, link-outs to related molecules on CDD and Chemspider, project meta-data and management, and the "Delete" button.
On the Overview tab, Definition section, click on Edit definition and structure to add additional identifiers, e.g.the Sigma catalog number (though, again, in general you want to be certain about its uniqueness). Click Add a synonym, and paste in the number: N4126-5G. Don't forget to "Save changes". Now niacin has two unique names by which it may be identified for either look-up during a search or as the molecule identifier when importing assay data. Notice the available structure formats once that the molecule is registered: SMILES, CXSMILES, InChI, InChIKey, IUPAC. You can export the structure in any of these formats, as well as MOL /SDF format.
While you're on the Overview tab, let's also add CAS number (CAS# 59-67-6) to the Molecule Definition section: click on Edit, and then fill in a value in the CAS input box, and don't forget to save.
The last section to point out on the Overview tab are two panels of calculated properties: Lipinski's on the left, and additional physicochemical to the right. These are calculated using CDD Vault's chemistry engine, and are based on the supplied structure. You can learn more about these properties by clicking on the icons. Here's what your Niacin record could look like. There is one associated batch, 0 plates to which this molecule is assigned, and 0 tested protocols. There are also no files attached to this record.
Alternate Compound Registration
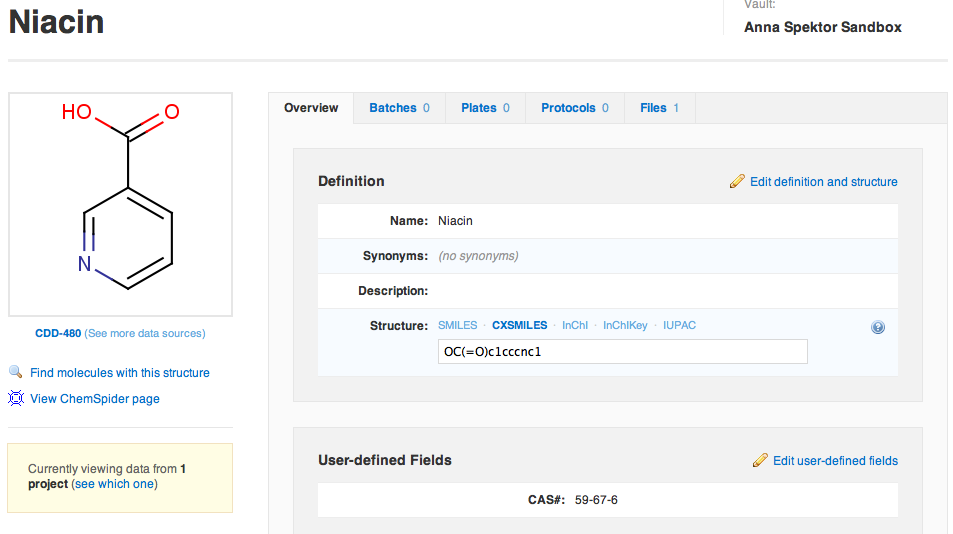
CDD also offers a flexible non-registration mode, where the user determines the naming convention. Batch tracking is not required, and salt stripping is not performed. The main advantage of this option is its flexibility, permitting structureless molecules, and variable naming rules for different subsets of structures (Note: structureless molecules are permitted in registration mode. This will be described in a later lesson). The user should be aware that this system will require more quality control (QC) upfront, before compounds are registered, since this system is more permissive than the default registration mode. Here is what niacin would look like if registered in this fashion:
The molecule is simply named "Niacin", with no registration ID automatically assigned. You can choose to assign a numeric ID, but this will need to be generated by you.
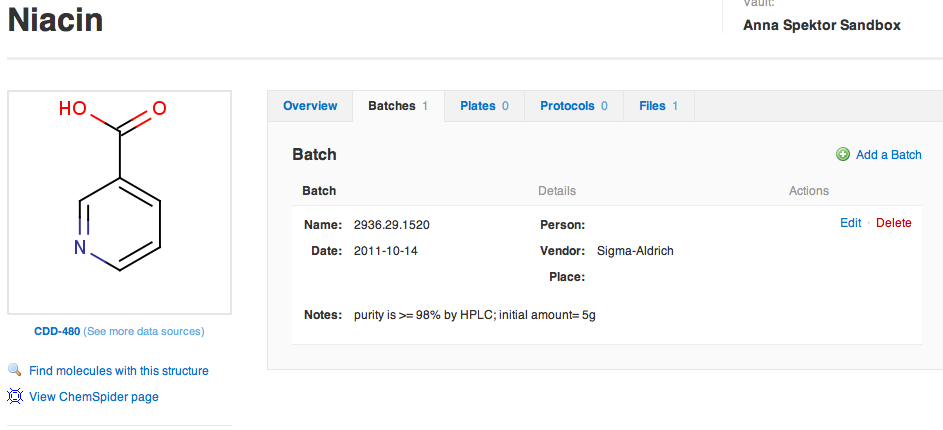
A batch is not automatically registered with the core molecule, but may be added after the core compound is registered. There are no required fields or naming conventions, so diligence is required from the user to maintain consistent data.
There is no Salt field or formula weight, since salt stripping is not performed. Every new salt form of niacin will become a new molecule record. It will be up to you to strip salts, and store relevant information in the Batch Notes section.
:
Bulk import from file
File formatting
Now that you know how to create a single molecule, we move to the next step of importing compounds in bulk from a properly formatted text file. CDD accepts two file formats for import: Comma Separated Values format, or CSV, and Structure Data File format, or SDF. A third format, .zip, is intended for import of multiple files at once, e.g. in the case of associated picture, pdf or other data to which a csv (or sdf) file would have a field with the corresponding file name included in that .zip file.
SDF files are usually supplied by compound vendors when purchasing a library, and can be generated by most standard cheminformatics tools. These files will be properly formatted by default and do not require any formatting. We recommend in general using sdf format especially when importing structure containing stereochemistry information since sdf handles this in general better and more specific than SMILES.
CSV files can be easily generated from Excel, and need to be formatted in a CDD-readable manner.
Here are the rules for creating a correct CSV file.
Each type of data must be entered into a separate column.
For example, if chemist name and vendor name are in the same column then separate them out.
The very first row of the file must contain column headers/labels. There may not be multiple header rows. CDD will use the headers to link the data in the column to the appropriate fields in the database.
Columns with a blank first row will be ignored.
The headers do not need to match CDD fields exactly, as you will specifically link/map your file to vault fields during import.
Please observe, if your file happens to have two rows of headers, where the second row has sub-headers, these must be combined into a single row.
Each row of data must include a molecule and batch identifier.
Recall that all data in CDD is pivoted around molecules, and we will not know how to associate the data unless a molecule ID and batch ID are supplied.
For example, if you are importing batch attributes, you need to include both the molecules' name and batch name.
A molecule may be uniquely identified by a combination of its' primary ID and batch name, or synonym and batch name, or plate and well reference, once the plate map is imported. If you have a unique batch name field defined, you can use this instead of the molecule name and batch name combination.
Molecule structure must be in MOL or SMILES format. Name to structure conversion based on common names and CAS numbers is possible but is not guaranteed.
SMILES is usually safest for CSV files, since it is not dependent on formatting such as line breaks (like MOL), and is not prone to errors.
For replicate data include each replicate on a separate row.
For example, if you are importing 3 batches of a single compound, include one row for each replicate, repeating the same molecular identifier on each row.
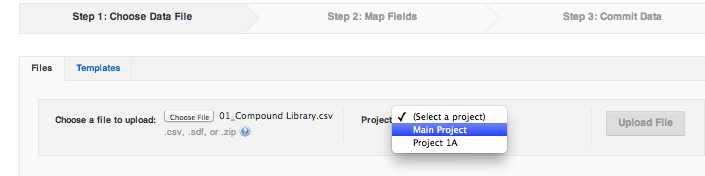
Import Step 1: Choose data file (and project)
In the this section we will practice importing a file containing a compound library. You can download a sample CSV file attached to this lesson, or use your own - prepared in Excel according to above rules, or a vendor SDF file. At the very minimum, your file should contain structures and required batch fields. Files are imported, not surprisingly, on the "Import Data" tab. The process follows a three step wizard staring a file upload and project selection, followed by a "mapping" step, where we instruct the database how to parse the file. Finally the wizard has us finish with a quality control and commit step.
The first step of the import wizard is to choose the file to upload from your computer, and to pick a project in CDD Vault where this file is going (drag and drop of the file onto the "Choose File" box is possible).
All data in a CDD Vault must be assigned to at least one project, so if you only have one project available, it will be automatically selected. If there are multiple projects, you must choose the project in step 1 of the import, otherwise CDD Vault will not let you move to the next step. The chosen file and it's contents will become associated with this project.
We will complete our example with a library file attached to this lesson, called Lesson2_CMPD_Library.csv. Whichever file you are using for practice, download it to your computer first. When a file and a project are selected, the "Upload file" button become available - click it to proceed to the next step.
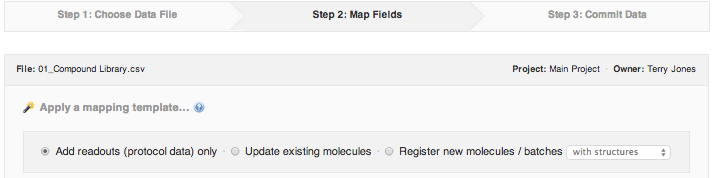
Import Step 2: Map fields
This is the main part of the import process, where you instruct the database how to parse your file, by "mapping" columns (in csv format) or fields (in SDF format) from your file to database fields. Since mapping is done explicitly by you, there is no need to match headers exactly between your file and CDD. Once you have completed a mapping, it may be saved for future use as a template. If you will use the same import file format for many libraries, this template will eliminate the need to go through the mapping one column at a time.
Choose the import setting that applies to your data:
Add readouts (protocol data) only - this is the default setting, and it applies any time you are importing assay (protocol) results. It is assumed that all compounds referenced in the import have been previously registered in your CDD Vault, otherwise you will receive errors. You may register plates in this mode (for previously registered compounds).
Update existing molecules - use this setting allows you to both, update existing molecules with new attributes (e.g. synonyms, batch fields, plates), and also import assay or protocol data. It is still assumed that all compounds referenced in the import have been previously registered in your CDD Vault, otherwise you will receive errors.
Register new molecules/batches (with structure/without structure) - use this setting when registering new compounds, or when registering new batches of existing compounds. It is assumed that the molecules and batches found in the file do not exist, and thus will be created on import. Should a compound already exist in the vault, a new batch will be created, but not without giving you a chance to review this before committing to the import (see later, Import Step 3). (Please note, that should you choose this setting for a dose-response data import file, you will inadvertently generate as many new batches, as you have serial dilutions.)
Since we're registering a library of compounds, make sure to select .
The rest of the mapping interface consists of your file preview, with a horizontal scroll-bar above to move across different columns and fields. The first column is automatically selected and highlighted in blue. Following this blue arrow down the page, you see a panel with CDD field selections. These are the fields in the CDD database available for mapping. The panel is divided into sections: Molecule fields, Batch fields, Plate and Well fields, Protocol fields, and lastly a Do not import option. CDD will try to help expedite the process by trying to guess the mapping of a given column according to its header. Most often the system will guess correctly, but if no best guess is available, the pre-selected field will be "Do not import". You can always override the best guess by choosing a different field. In case of the sample file, the best guess mapping for the first column in correct: the column called "Synonym" should be mapped to the field "Molecule Name or Synonym" in the database. Notice that you have additional options below the "Best Guess": you can choose to add a prefix to the molecule names, and to assign data in this column as a primary molecule names. In this example, we will not need any prefix. When you are satisfied with the mapping, click "Apply".
Once the mapping is applied, the blank status in the file preview changes to the green mapped status, and the blue highlighting jumps to the next column. A best guess is done on the second column, correctly surmising that column "SMILES" contains SMILES representation of compound structures, and should be mapped to the Structure field under Molecule fields. We can just click "Apply", and continue to the next column.
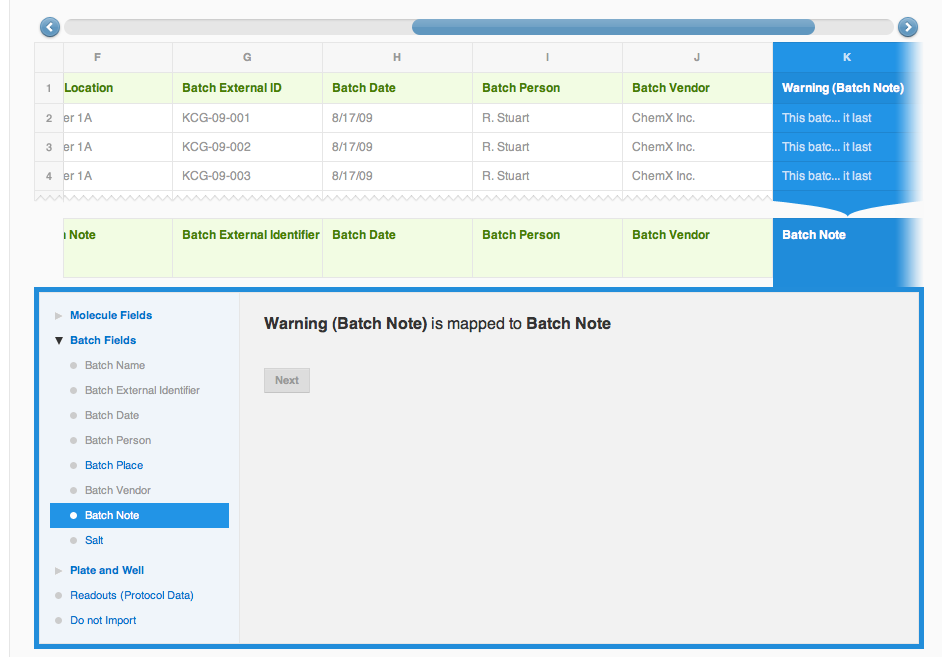
The next column is "Solvent". We will want to associate solvent information with the molecule record, and will store it in a Molecule field under Molecule fields. [Please note, that this is just one more example on how to handle your data; after one of the recent vault updates since creating this documentation, Solvent can actually be mapped with the structure itself, just like a Salt]. When creating a new field for the first time, choose "Create new field" option from the drop-down, otherwise choose an existing field. Columns "Plate" and "Well" will also be mapped correctly under Plate and Well fields, so all we need to do, is click "Apply" each time. Here's what the mapping should look like now: columns A through E are mapped, with the corresponding database field is shown in the bottom row of the preview, column F "Plate Location" is highlighted with the "Do not import" option selected. CDD can not provide a best guess for this column mapping, but we can map it manually by assigning this column to Batch Fields -> Batch Note (if it is defined, else you can create as above mentioned manually, or simply skip them).
Columns G through K contain batch information, and will be guessed by the wizard. Do not forget to click "Apply" for each column. The last column called "Warning (Batch Note)" will be manually mapped to Batch Fields -> Batch Note (! unless you have mapped the Plate Location to this already; not that you can map a field only to one column at a time!).The final mapping preview should look something like the screen-shot on the left.
You can use the horizontal scroll-bar at the top to review your mappings. If everything looks correct, you are ready for the next steps. You can Save this mapping as a template…, and "Process File".
Import Step 3: Commit Data
The final step of the import process requires the user to commit or reject the import after reviewing a validation report. At this stage, no data has been written to the database, and the page displays a report with a summary of import events to be finalized.
The summary is divided into sections of Noteworthy events, Suspicious events and Errors. The report will include a preview of the problematic data and suggest possible causes of the problem in the section descriptions. Each section may be selectively accepted or rejected. You can also download any section of the report by clicking the Download link at the bottom of each section. Data review is an important step, learn more about it in this article.
Importing our example file, your report should look like this, if everything went well: 79 new molecules, one new batch for a new molecule (this file has the same structure in two rows, so two batches are created). In this case, it's the expected behavior, we are expecting two batches for one compound, and we will accept this section. Lastly, one new plate is being registered. Click on the sections to see expanded explanations and previews. When ready, click Commit Data Import. Compounds are now being registered in your vault. You will see a progress notification on top of the report. For large import, you can click on the "notify by email" link; this allows you to do other things in vault (or otherwise). Once the import is finished you will receive an email notification! [!if you are testing this in your own vault containing other data, these numbers might look different!]
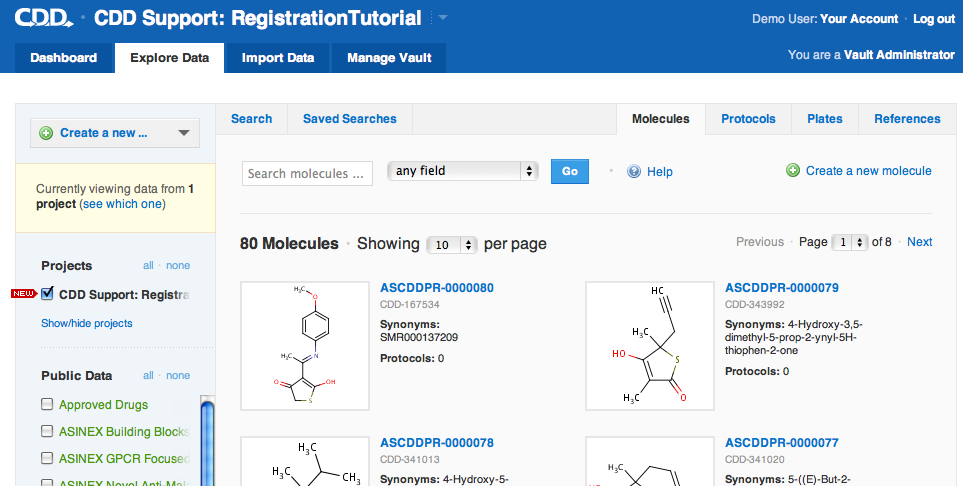
Where are my compounds?
A data import is completed when the "commit" step is finished, and the validation report is updated. You can access your newly registered compounds directly from the validation report by clicking on the "Explore Imported Data" link. You can also download a file with new compound IDs. The primary view of the data, however, is from the main Explore Data tab. Here you can browse all the compounds in your projects, and perform queries on any molecule-related information, including structures. Learn more about reporting and searching data in this section of the Knowledgebase.
Navigate to the Molecules sub-tab on Explore Data. If you don't see any structures, make sure you have selected your project in the side-bar on the left of the screen. Once the project check box is clicked, you should see 79 structure records (you will end up on this page directly if you clicked the "Explore Imported Data" link mentioned above). Compounds are always displayed in reverse chronological order, so you see the most recently imported compounds first. Click on the first compound - it should be compound 80. The form should already be familiar to you - we have seen it when registering niacin.
.
Go back to view all molecules and search for "354132". You will find that this is a synonym for compound #68. You will also see that this compound has another ID associated to it: CDD-341044. Any compound with a CDD ID, is registered in CDD's public domain, in addition to being a private compound in your vault. Obviously no one but you knows of the existence of this molecule in your vault. You are able to see public data registered by someone else, but not vice versa - anyone viewing public compounds won't see who else might have them or not. You can find out exactly what other data is available for this compound when you open the detailed record, and follow the links under the CDD number.
Summary
In this lesson we learned how to register molecules in a project. We manually registered Niacin using the Ketcher Structure Editor, and then imported an entire plate of compounds from file. We learned about all the required fields during compound registration, how to use the import wizard, and looked at the import validation report.
By looking at the compound registration example, we have learned about data import in general, since all the basic steps will be the same regardless of the imported data type. We will now move on to setting up the vault for biological data. Structure-activity relationships cannot be established until the newly imported chemical structures are annotated with biological assay results.

 This is a structure image. You can draw it in the structure editor, or paste as a SMILES string:

 :
:


 .
.